Working with Objects
Using objects you can add a great deal of information to your map for use in your game. They can replace tedious alternatives like hardcoding coordinates (like spawn points) in your source code or maintaining additional data files for storing gameplay elements.
By using tile objects, objects of various types can be made easy to recognize or they can be used for purely graphical purposes. In some cases they can replace the use of tile layers entirely, as demonstrated by the “Sticker Knight” example shipping with Tiled.
All objects can have custom properties, which can also be used to create connections between objects.
To start using objects, add an Object Layer to your map.
Placement Tools
Each type of object has its own placement tool.
A preview is shown of the object you’re about to place when you hover
over the map. While placing an object, you can press Escape or
right-click to cancel placement of the object. Press Escape again
to switch to the Select Objects tool.
Insert Rectangle
Shortcut: R 
The rectangle was the first type of object supported by Tiled, which is why objects are rectangles by default in the TMX Map Format. They are useful for marking rectangular areas and assigning custom properties to them. They are also often used for specifying collision boxes.
Place a rectangle by clicking-and-dragging in any direction. Holding
Shift makes it square and holding Ctrl snaps its size to the
tile size.
Rectangle objects have their origin in the top-left. However, if the rectangle is empty (width and height are both 0), it is rendered as a small square around its position. This is mainly to keep it visible and selectable.
Insert Point
Shortcut: I 
Points are the simplest objects you can place on a map. They only represent a location, and cannot be resized or rotated. Simply click on the map to position a point object.
Insert Ellipse
Shortcut: C 
Ellipses work the same way as rectangles, except that they are rendered as an ellipse. Useful for when your area or collision shape needs to represent a circle or ellipse.
Insert Capsule
Shortcut: Shift+C 
Capsules work the same way as rectangles, except that they are rendered as a capsule. Useful for when your area or collision shape needs to represent a circle or capsule.
Insert Polygon
Shortcut: P 
Polygons are the most flexible way of defining the shape of an area. They are most commonly used for defining collision shapes.
When placing a polygon, the first click determines the location of the
object as well as the location of the first point of the polygon.
Subsequent clicks are used to add additional points to the polygon.
Polygons needs to have at least three points. Click the first point
again to finish creating the polygon. You can press Escape to cancel
the creation of the polygon.
When you want to change a polygon after it has been placed, you need to use the Edit Polygons tool.
Polylines
Polylines are created by not closing a polygon. Right-click or press Enter while creating a polygon to finish it as a polyline.
Polylines are rendered as a line and require only two points. While they can represent collision walls, they are also often used to represent paths to be followed.
You can extend an existing polyline at either end when it is selected, by clicking on the displayed dots. It is also possible to finish the polyline by connecting it to either end of another existing polyline object. The other polyline object needs to be selected as well, since the interactive dots only show on selected polylines.
The Edit Polygons tool is used to edit polylines as well.
Insert Tile
Shortcut: T 
Tiles can be inserted as objects to have full flexibility in placing, scaling and rotating the tile image on your map. Like all objects, tile objects can also have custom properties associated with them. This makes them useful for placement of recognizable interactive objects that need special information, like a chest with defined contents or an NPC with defined script.
To place a tile object, first select the tile you want to place in the Tilesets view. Then use the Left mouse button on the map to start placing the object, move to position it and release to finish placing the object.
To change the tile used by existing tile objects, select all the objects you want to change using the Select Objects tool and then right-click on a tile in the Tilesets view, and choose Replace Tile of Selected Objects.
You can customize the alignment of tile objects using the Object Alignment property on the Tileset. For compatibility reasons this property is set to Unspecified by default, in which case tile objects are bottom-left aligned in all orientations except on Isometric maps, where they are bottom-center aligned. Setting this property to Top Left makes the alignment of tile objects consistent with that of rectangle objects.
Insert Template
Shortcut: V 
Can be used to quickly insert multiple instances of the template selected in the Templates view. See Creating Template Instances.
Insert Text
Shortcut: X 
Text objects can be used to add arbitrary multi-line text to your maps. You can configure various font properties and the wrapping / clipping area, making them useful for both quick notes as well as text used in the game.
Select Objects
Shortcut: S 
When you’re not inserting new objects, you’re generally using the Select Objects tool. It packs a lot of functionality, which is outlined below.
Selecting and Deselecting
You can select objects by clicking them or by dragging a rectangular
lasso, selecting any object that intersect with its area. By holding
Shift or Ctrl while clicking, you can add/remove single objects
to/from the selection. Press Escape to deselect all objects.
When pressing and dragging on an object, this object is selected and
moved. When this prevents you from starting a rectangular selection, you
can hold Shift to force the selection rectangle.
By default you interact with the top-most object. When you need to
select an object below another object, first select the higher object
and then hold Alt while clicking at the same location to select
lower objects. You can also hold Alt while opening the context menu
to get a list of all objects at the clicked location, so you may
directly select the desired object.
You can quickly switch to the Edit Polygons tool by double-clicking on the polygon or polyline you want to edit.
Moving
You can simply drag any single object, or drag already selected objects
by dragging any one of them. Hold Ctrl to toggle snapping to the
tile grid.
Hold Alt to force a move operation on the currently selected
objects, regardless of where you click on the map. This is useful when
the selected objects are small or covered by other objects.
The selected objects can also be moved with the arrow keys. By default
this moves the objects pixel by pixel. Hold Shift while using the
arrow keys to move the objects by distance of one tile.
Resizing
You can use the resize handles to resize one or more selected objects.
Hold Ctrl to keep the aspect ratio of the object and/or Shift to
place the resize origin in the center.
Note that you can only change width and height independently when resizing a single object. When having multiple objects selected, the aspect ratio is constant because there would be no way to make that work for rotated objects without full support for transformations.
Rotating
To rotate, click any selected object to change the resize handles into
rotation handles. Before rotating, you can drag the rotation origin to
another position if necessary. Hold Shift to rotate in 15-degree
increments. Click any selected object again to go back to resize mode.
You can also rotate the selected objects in 90-degree steps by pressing
Z or Shift + Z.
Changing Stacking Order
If the active Object Layer has its Draw Order property set to Manual (the default is Top Down), you can control the stacking order of the selected objects within their object layer using the following keys:
PgUp- Raise selected objectsPgDown- Lower selected objectsHome- Move selected objects to TopEnd- Move selected objects to Bottom
You can also find these actions in the context menu. When you have multiple Object Layers, the context menu also contains actions to move the selected objects to another layer.
Flipping Objects
You can flip the selected objects horizontally by pressing X or
vertically by pressing Y. For tile objects, this also flips their
images.
Edit Polygons
Shortcut: E
Polygons and polylines have their own editing needs and as such are
covered by a separate tool, which allows selecting and moving around
their nodes. You can select and move the nodes of multiple polygons at
the same time. Click a segment to select the nodes at both ends. Press
Escape to deselect all nodes, or to switch back to the
Select Objects tool.
Nodes can be deleted by selecting them and choosing “Delete Nodes” from
the context menu. The Delete key can also be used to delete the
selected nodes, or the selected objects if no nodes are selected.
When you have selected multiple consecutive nodes of the same polygon, you can join them together by choosing “Join Nodes” from the context menu. You can also split the segments in between the nodes by choosing “Split Segments”. Alternatively, you can simply double-click a segment to split it at that location.
You can also delete a segment when two consecutive nodes are selected in a polygon by choosing “Delete Segment” in the context menu. This will convert a polygon into a polyline, or turn one polyline object in two polyline objects.
It is possible to extend a polyline at either end, either by right-clicking those nodes and choosing “Extend Polyline”, or by switching to the Insert Polygon tool and clicking on either end of an already selected polyline.
While creating or extending a polygon/polyline with the
Insert Polygon tool, you can press Backspace to remove the
previously added point.
Connecting Objects
It can often be useful to connect one object with another, like when a switch
should open a certain door or an NPC should follow a certain path. To do this,
add a custom property of type object to the source object. This property
can then be set to the desired target object in several ways.
Make sure the property value is selected, as seen on the following screenshot:
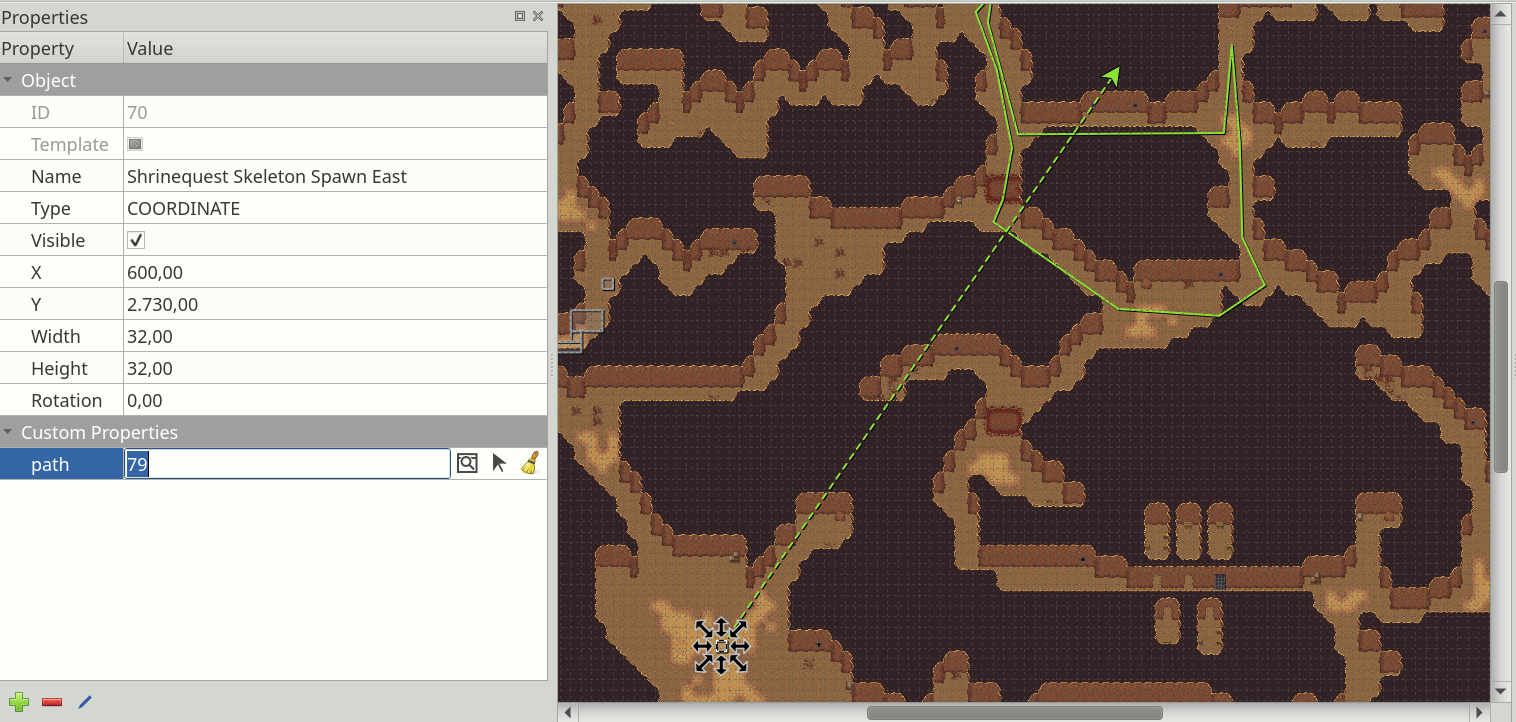
Object Connection Property
Then, you can set the connection by either:
Typing in the ID of the target object.
Clicking the icon with the window and magnifier, to open a dialog where you can filter all objects on the map to find your target object.
Clicking the arrow icon and then clicking an object on the map to set it as the target object.
As shown on the screenshot above, any connections between objects are rendered as arrows, taking the color of their target object (defined as part of the object class or by the color of the object layer). You can toggle the display of these arrows using View -> Show Object References.
If you’d like to get to the target object, but it’s very far away, you can jump there by right-clicking the property and selecting Go to Object.