GameMaker: Studio 1.4
GameMaker: Studio 1.4 uses a custom XML-based format to store its rooms, and Tiled ships with a plugin to export maps in this format. Currently only orthogonal maps will export correctly.
Tile layers and tile objects (when no class is set) will export as “tile” elements. These support horizontal and vertical flipping, but no rotation. For tile objects, scaling is also supported.
Warning
The tilesets have to be named the same as the corresponding backgrounds
in the GameMaker project. Otherwise GameMaker will pop up an error for each
tile while loading the exported room.gmx file.
Object Instances
GameMaker object instances are created by putting the object name in the “Class” field of the object in Tiled. Rotation is supported here, and for tile objects also flipping and scaling is supported (though flipping in combination with rotation doesn’t appear to work in GameMaker).
The following custom properties can be set on objects to affect the exported instance:
string
code(instance creation code, default: “”)float
scaleX(default: derived from tile or 1.0)float
scaleY(default: derived from tile or 1.0)int
originX(default: 0)int
originY(default: 0)
The scaleX and scaleY properties can be used to override the
scale of the instance. However, if the scale is relevant then it will
generally be easier to use a tile object, in which case it is
automatically derived from the tile size and the object size.
The originX and originY properties can be used to tell Tiled
about the origin of the object defined in GameMaker, as an offset from
the top-left. This origin is taken into account when determining the
position of the exported instance.
Hint
Of course setting the class and/or the above properties manually for each instance will get old fast. Since Tiled 1.0.2, you can instead use tile objects with the class set on the tile, and in Tiled 1.1 you can also use object templates.
Views
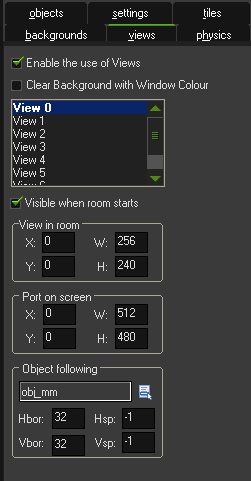
Views can be defined using rectangle objects
where the Class has been set to view. The position and size will be
snapped to pixels. Whether the view is visible when the room starts
depends on whether the object is visible. The use of views is
automatically enabled when any views are defined.
The following custom properties can be used to define the various other properties of the view:
Port on screen
int
xport(default: 0)int
yport(default: 0)int
wport(default: 1024)int
hport(default: 768)
Object following
string
objNameint
hborder(default: 32)int
vborder(default: 32)int
hspeed(default: -1)int
vspeed(default: -1)
Hint
When you’re defining views in Tiled, it is useful to add view
as class in the Custom Types Editor,
adding the above properties for ease of access. If you frequently use
views with similar settings, you can set up
templates for them.
Map Properties
General
int
speed(default: 30)bool
persistent(default: false)bool
clearDisplayBuffer(default: true)bool
clearViewBackground(default: false)string
code(map creation code, default: “”)
Physics
bool
PhysicsWorld(default: false)int
PhysicsWorldTop(default: 0)int
PhysicsWorldLeft(default: 0)int
PhysicsWorldRight(default: width of map in pixels)int
PhysicsWorldBottom(default: height of map in pixels)float
PhysicsWorldGravityX(default: 0.0)float
PhysicsWorldGravityY(default: 10.0)float
PhysicsWorldPixToMeters(default: 0.1)
Layer Properties
Both tile layers and object layers may produce “tile” elements in the exported room file. Their depth is set automatically, with tiles from the bottom-most layer getting a value of 10000000 (the GameMaker default) and counting up from there. If you want to set a custom depth value you can set the following property on the layer:
int
depth(default: 10000000 + N)